Hop Postmaster
Current Version: 1.0.1- EE6
- EE7
-
Installation
- Unzip the folder to a temporary location on your local hard drive.
- FTP the files from their local folders to the same locations in your EE install’s /system/user/addons/ folder on the server.
- Navigate to Add-ons in your EE control panel and install the add-on. That’s it!
-
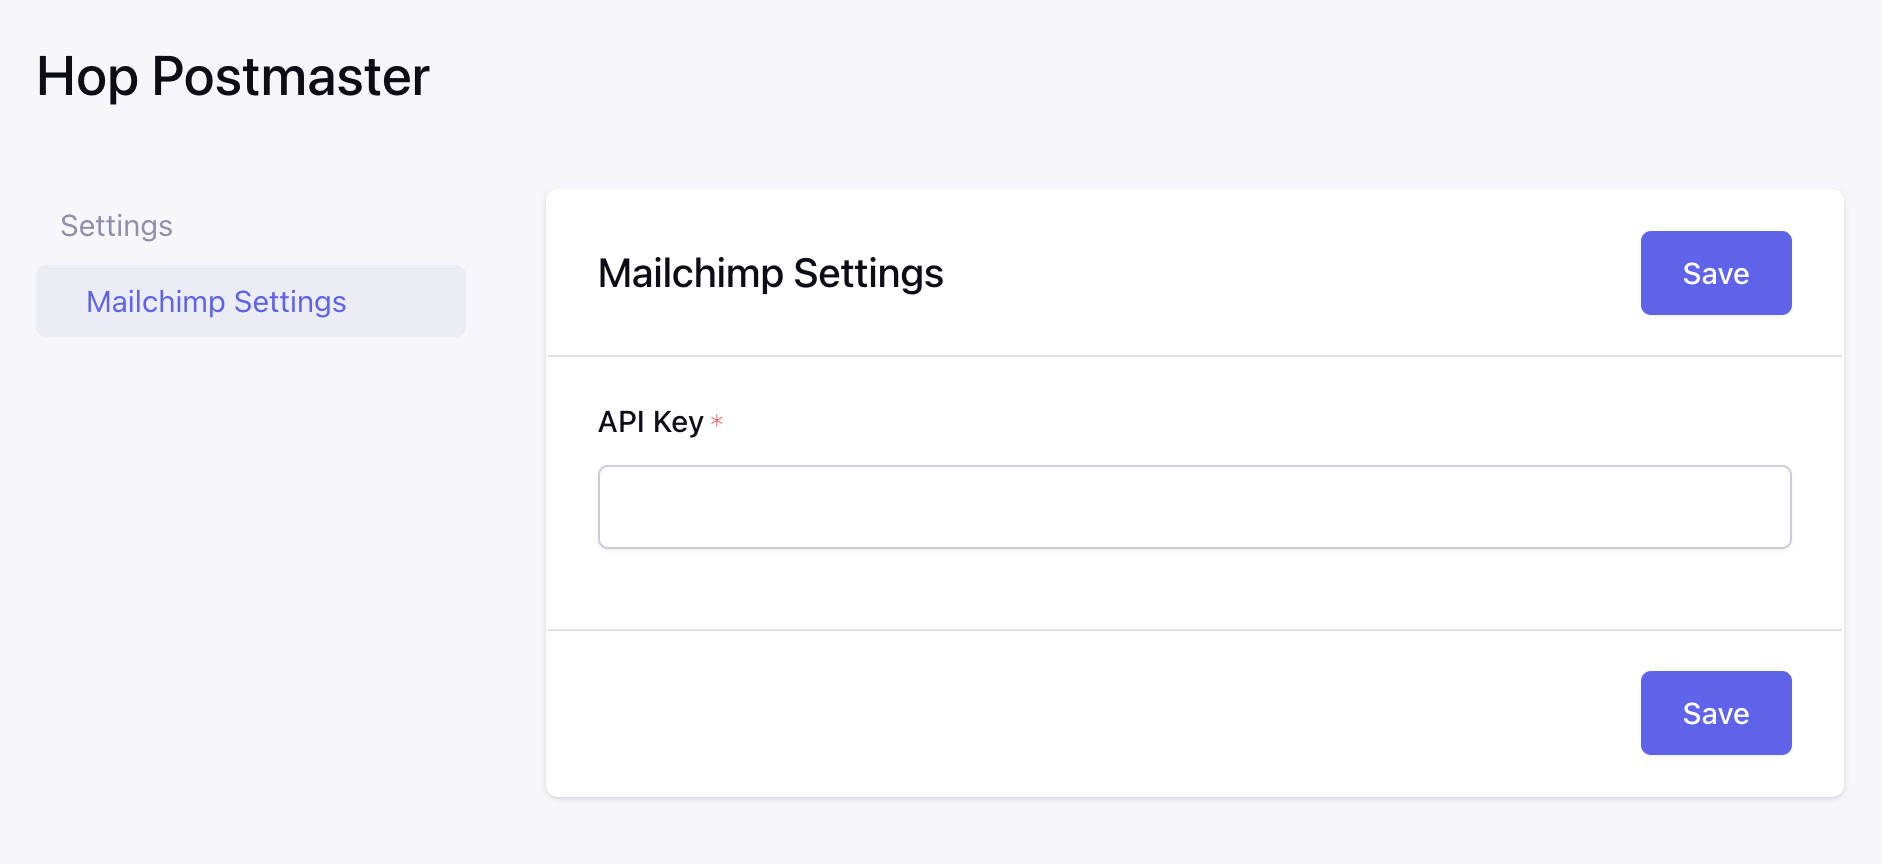
Mailchimp Settings: API
There are two one-time set-up steps to make Mailchimp ready to receive emails from Hop Postmaster.
1. Create a Mailchimp API Key
First, link Hop Postmaster with Mailchimp by setting up an API Key in Mailchimp and pasting it into the add-on settings.
Create a new API Key in Mailchimp at https://admin.mailchimp.com/account/api/ or by navigating to Account & billing > Extras > API Keys. Be sure to copy the key when prompted; it cannot be accessed again later. It should end in -us# (Learn more about Mailchimp API Keys.)
In EE, go to Add-ons > Hop Postmaster and put the key into the API Key field. Click Save.
TIP: Make sure your domain is verified by Mailchimp in order to achieve maximum deliverability.
NOTE: Hop Studios is not responsible for how you set up your Mailchimp account, and Hop Studios cannot provide unpaid support or assistance with this part of the process beyond these instructions. If you do need additional assistance, contact us to arrange for paid support at very reasonable prices.
-
Mailchimp Settings: Mailchimp Template
2. Create a Mailchimp Template
Create a simple Mailchimp template to receive your email newsletters. At a minimum, the template must include the basic tags and data shown in this example template:
<!DOCTYPE html PUBLIC "-//W3C//DTD XHTML 1.0 Transitional//EN" "http://www.w3.org/TR/xhtml1/DTD/xhtml1-transitional.dtd">
<html>
  <style>.mcnPreviewText{display: none !important;}</style>
  <body>
    <!--*|IF:MC_PREVIEW_TEXT|*-->
    <!--[if !gte mso 9]><!----><span class="mcnPreviewText" style="display:none; font-size:0px; line-height:0px; max-height:0px; max-width:0px; opacity:0; overflow:hidden; visibility:hidden; mso-hide:all;">*|MC_PREVIEW_TEXT|*</span><!--<![endif]-->
    <!--*|END:IF|*-->
    <div mc:edit="body"></div>
  </body>
</html>
<div mc:edit="body"></div>is required; this is where your Hop Postmaster content will go.If you want to get fancier with your template, you can do so in Mailchimp or you can develop the template in ExpressionEngine.
(If you’re new to creating email templates from scratch, here’s a good starting point.)
-
Create a Field
Choose a channel to from which to send your newsletters.
The channel must have at least one field, which can be named anything you wish, but its type must be set to Hop Postmaster. In this screenshot, the field is named Send eNewsletter. It may be slightly more efficient to set this up through the Channel or the Field Group you want this field in.
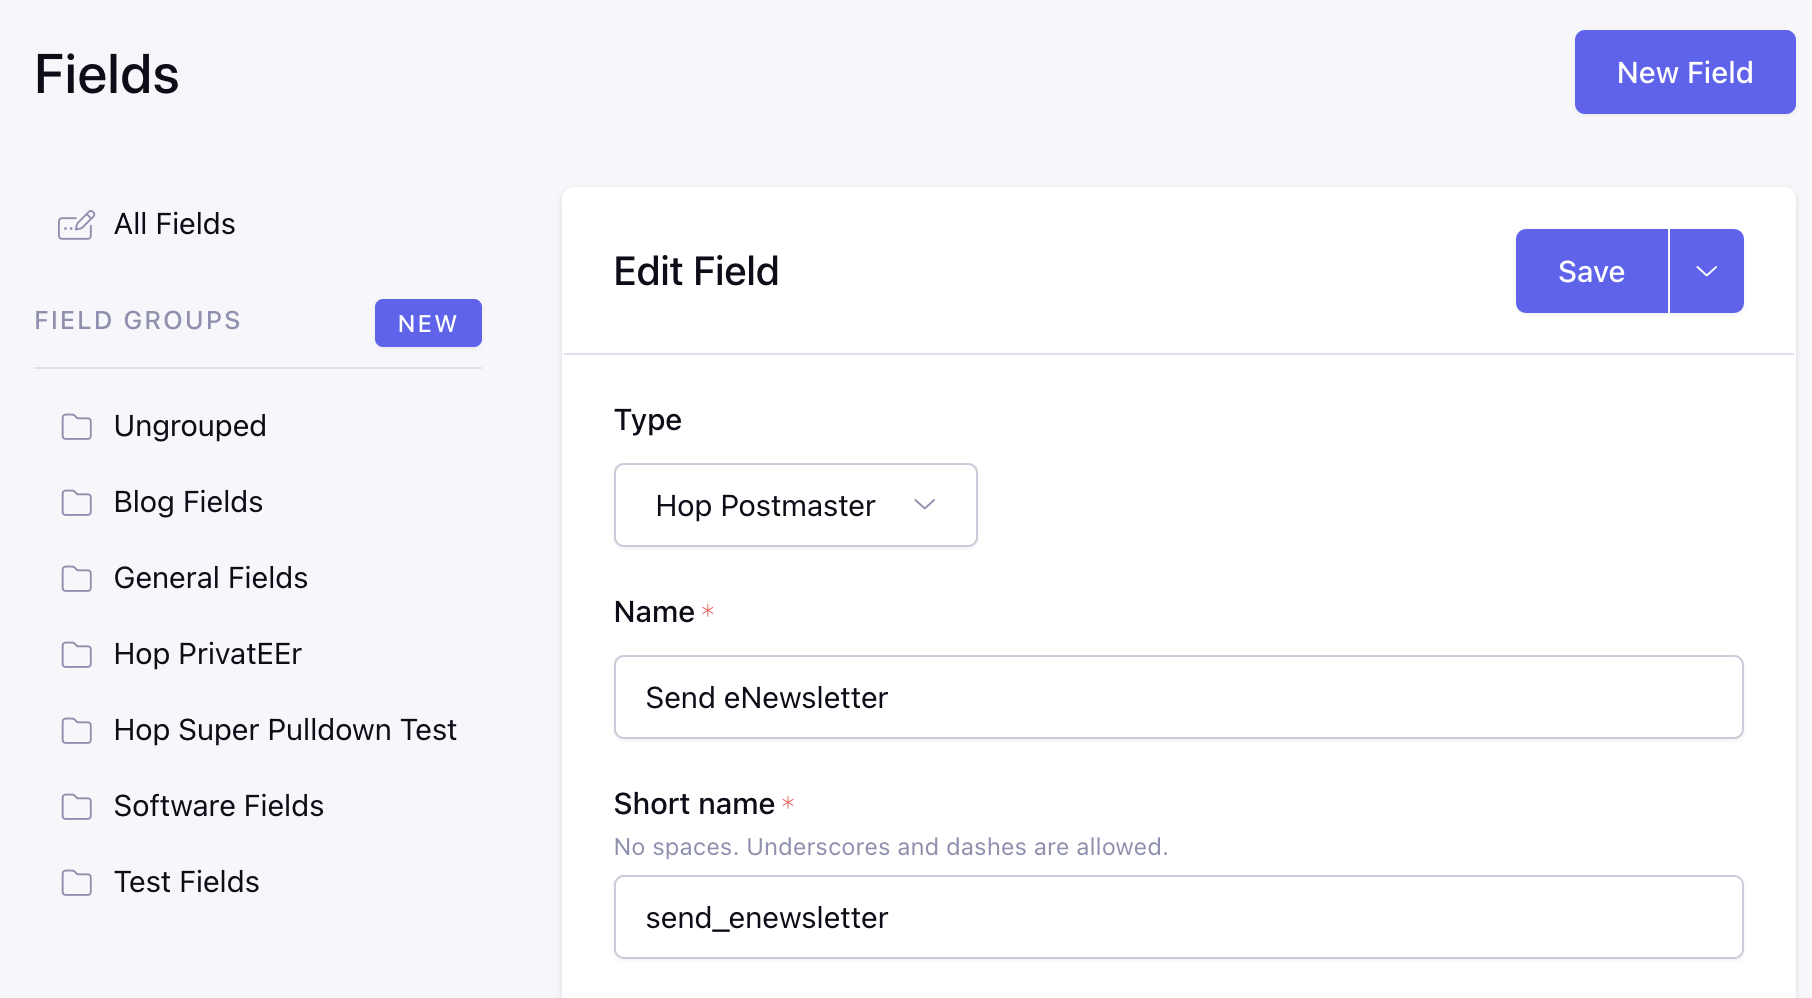
You can ignore most of the default EE options for this field. Note the following:
Require field should be left unselected.
Include in search is irrelevant as the field is not searchable.
Front-end editing is not supported.
In Field Options, configure the following:
Emailing Service
Hop Postmaster currently only supports Mailchimp. However, we are looking forward to adding additional email services. Contact us and suggest one!
For each of the following fields, you may set default values or leave them blank. These values can be overridden in individual newsletter entries.
From Email
The email address the message is sent from. This address needs to be valid on the Mailchimp side. Hop Postmaster does not verify whether an address is valid.
From Name
Enter a display name you would like to have as the default displayed From name. You can modify this on each individual email you send.
Subject Line
Enter a subject line you would like to have as the default subject line. You can modify this on each individual email you send.
Preview Text
The preview text displaying after the subject line. Read more about MC_PREVIEW_TEXT
Content / Template Code
This is the default content that will be sent to Mailchimp as the content of your email. In the entry, this field will be in the Content section, labeled Template Code. See below for more details on how to use this field.
Mailchimp Template
Choose the default Mailchimp template you would like to have for the emails you send. These are templates from Mailchimp, not from EE – you administer them at Mailchimp.
Important your content will be sent to
<div mc:edit="body"></div>so make sure to include that in your custom email template.Audience List
Choose your default audience list. You can modify this on each individual email you send.
Segment
Choose your default segment – this is the actual list to which you will be sending. You can modify this on each individual email you send. You likely want to make the default a small or testing list for safety’s sake.
Tip
The options for Mailchimp Template, Audience List, and Segment are populated from Mailchimp. If you don’t see any options in these fields, be sure you have handled the Mailchimp API Key setup.
Bonus Tip: Hop Introvert
If you haven’t tried Hop Introvert yet, give it a go! It makes it very easy to identify where a field is currently in use, and can come in handy when configuring fields in situations like this.
-
The Content Field
Hop Postmaster provides a Content field to contain your newsletter content. This field can contain HTML and EE code. Setting up a default value will give newsletter creators a quick way to start, and allow you to include content that doesn’t change from newsletter to newsletter, like the header and footer.
However, you may choose to use the Content field as a way to dynamically embed a standard EE template and call in the current newsletter entry. For example:
{embed="_layouts/enewsletter" entry_id="{this:entry_id}"}When using this approach, set up a separate field for your newsletter content in the newsletter channel, since the Content field is used to embed the EE template. This field can be a textarea, Rich Text Editor, WYGWAM, or any other field you want to use to contain and style newsletter content. If you want to get really fancy, you can set up multiple content fields as long as you handle them all within the newsletter template.
In this example, the EE template calls the channel and the additional message content field.
{exp:channel:entries entry_id="{embed:entry_id}" limit="1"}
  {title}
  <hr>
  {message_content}
{/exp:channel:entries}
There are a number of advantages to using this method over simply putting your newsletter code directly into the Content field:
Setting up your newsletter as a standard EE template allows you to edit that template in the same way you edit other EE templates.
Any part of the layout that is consistent from newsletter to newsletter — the header and footer, for example — can be placed in the template and won’t have to be manipulated or dealt with in the newsletter entry. This can make producing a consistent newsletter faster.
Similarly, having consistent content in the newsletter template means it can’t be changed in the newsletter entry. This can be helpful to ensure style consistency, or just to keep people from making changes. 😉
Having the newsletter code in the template means you only have one place to update if you make changes to your layout, rather than potentially editing multiple newsletter entries.
Do you have multiple newsletters with different layouts? Set up multiple EE templates and change which one is being called on an entry-by-entry basis.
The template can act as a web version of the email.
Tip: If you make use of the Closed entry status in your newsletter channel, make sure that any EE code that calls it is set up to display entries with the Closed status. The same advice also applies to the entry’s Entry Date value – you may very well want to send an email based on an entry that has an Entry Date in the future. As long as the Content field can process and display that entry (
show_future_entries=”yes”will allow this) you should have no problems. -
Send a Newsletter
When you’re ready to send a newsletter, start a new entry in the newsletter channel. Give your entry a title and click Save. This will cause the Hop Postmaster fields to be shown in the entry.

The Hop Postmaster fields will populate with the default values created in the field settings. You can change them within entries.
Add your newsletter content to the Content field, or if you used the Content field to embed an EE template, in the field(s) you created for newsletter content. A common workflow might be to set up the newsletter initially to use an audience and/or segment that sends to you and anyone else responsible for reviewing/approving the newsletter. This allows you to send test messages while you work on the newsletter content. Once the email is finalized, you can change your settings to the actual audience/segment for the newsletter.
Click Preview below the Template Code field to preview your email newsletter. It will show you the latest saved entry integrated with the content template. Please note that this will only show you a preview of code and content in EE, not in the Mailchimp template.
-
Sending Time & Status
Most email settings will be derived from the Hop Postmaster field except the Campaign Title; it will utilize the value from the EE Entry Title instead. This approach differs from the Subject Line setting to enhance the organization of email campaigns, making it easier to manage and track emails.
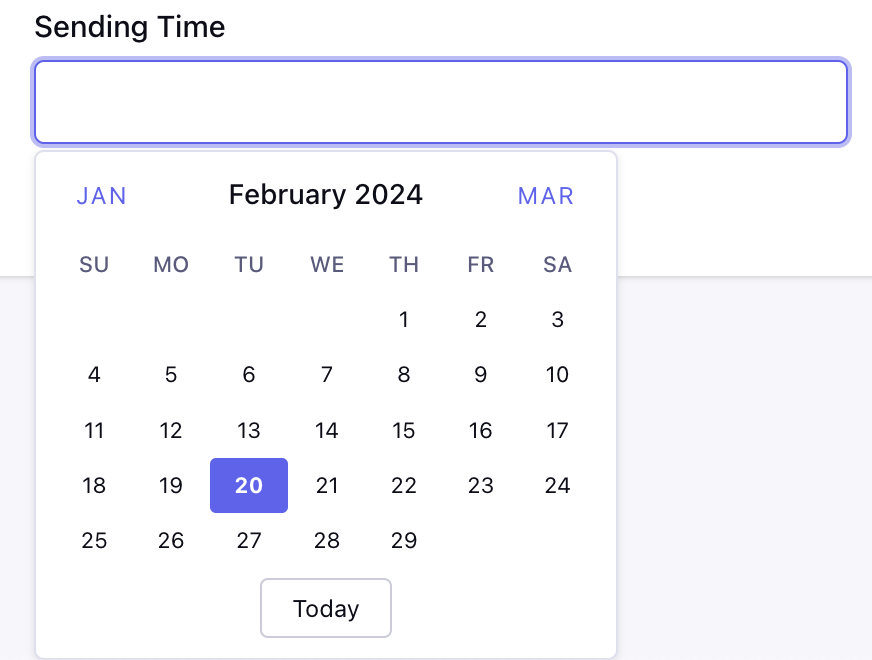
Sending Time
When you want to send the newsletter, whether to a test or real audience/segment, use the Sending Time field to choose the date and time the email should be sent. There are a lot of things to consider and watch out for here.
Be aware of the date/time settings in Mailchimp, ExpressionEngine and for your ExpressionEngine account. Hop Postmaster schedules/send based on the EE time, regardless of what your Mailchimp time setting is. Be aware that this may mean you see a different time in EE than you do if you check the Mailchimp campaign. For example, if EE is set to Pacific time, and Mailchimp is set to Eastern time, a newsletter scheduled to send at 2pm Pacific will show as 2pm in the newsletter entry, and 5pm in Mailchimp.
Important: If your ExpressionEngine account uses a different time zone than EE does, the account time zone takes precedence and will be the time used for scheduling. This can introduce confusion and inaccuracy! Our recommendation is to ensure that the accounts used to schedule newsletter send times use the same date and time setting EE uses.
Type the time/date or select the date using the date picker that appears when you click into the Sending Time field. If you enter an invalid time/date or modify a date picker selection incorrectly, the field will empty, and you will need to enter a valid time/date.
If you choose a time/date that is the current time, in the past, or leave the time blank, the email will be sent immediately if the Send Status is set to Send or Schedule, and the entry is saved.
If you choose a time in the future, the time is automatically rounded to the nearest quarter hour, e.g., 10:00, 10:15, 10:30, or 10:45. This is because Mailchimp only allows scheduled sends at those intervals.
If you change the date using the date picker, the date picker will also adjust the time to the current time.
Send Status
Once you set Sending Time, change the Send Status from Not Sent to Send or Schedule, and save the entry. If your Sending Time is the current date/time or in the past, your newsletter sends immediately, and Send Status changes to Sent. If your Sending Time is in the future, the campaign is scheduled for that date/time, and Send Status changes to Sent.
WARNING: Setting Send Status to Send or Schedule or Send or Schedule Another and saving the entry triggers the connection to Mailchimp. Setting Send Status and saving the entry controls whether an email is being sent or not!
-
After a Send
Once an entry has been sent at least once, the options in Send Status become Sent and Send or Schedule Another. Sent reflects that the email has been sent or scheduled. Use Send or Schedule Another if you want to send again.
IMPORTANT: Once you schedule an email to send, you can only modify the content, scheduled send date/time, or stop the send by editing the campaign in Mailchimp. In other words, if you set Sending Time to 2:45 and Send Status to Send or Schedule, and save your entry, the newsletter will send at 2:45 even if you then change Sending Time to 3:00 and set Send Status to Send or Schedule Another. This is because each time you send or schedule, a new campaign is created in Mailchimp rather than a single campaign being updated.
WARNING: Don’t confuse Send Status with EE entry statuses – the two are not related, and you can send an email regardless of the entry status. This is important, so we’re repeating it: you can send an email regardless of the entry status, even if the entry status is Closed. EE entry status has no effect on email sending.
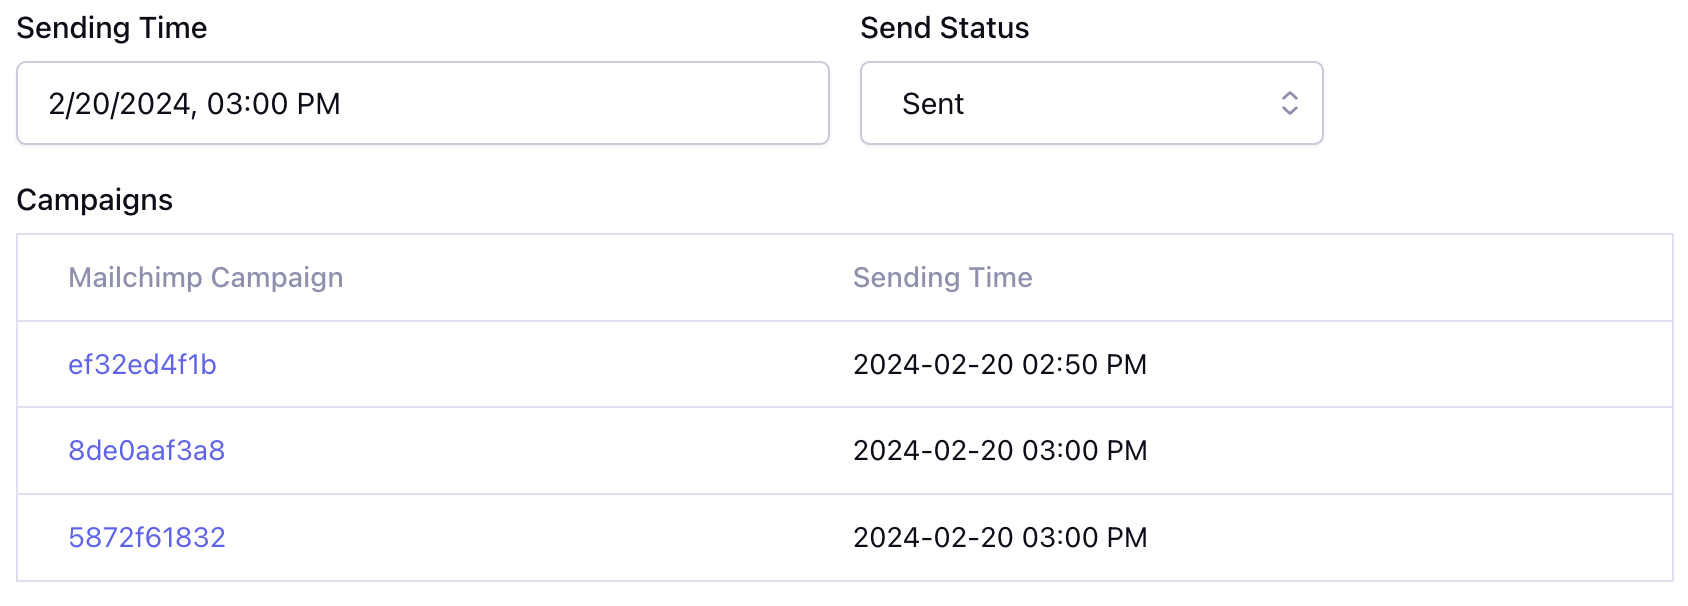
Once an entry has been sent, the Mailchimp campaign report link is shown in the entry. Click to view the report in Mailchimp. If you send more than once from the same entry, each campaign report is linked.
-
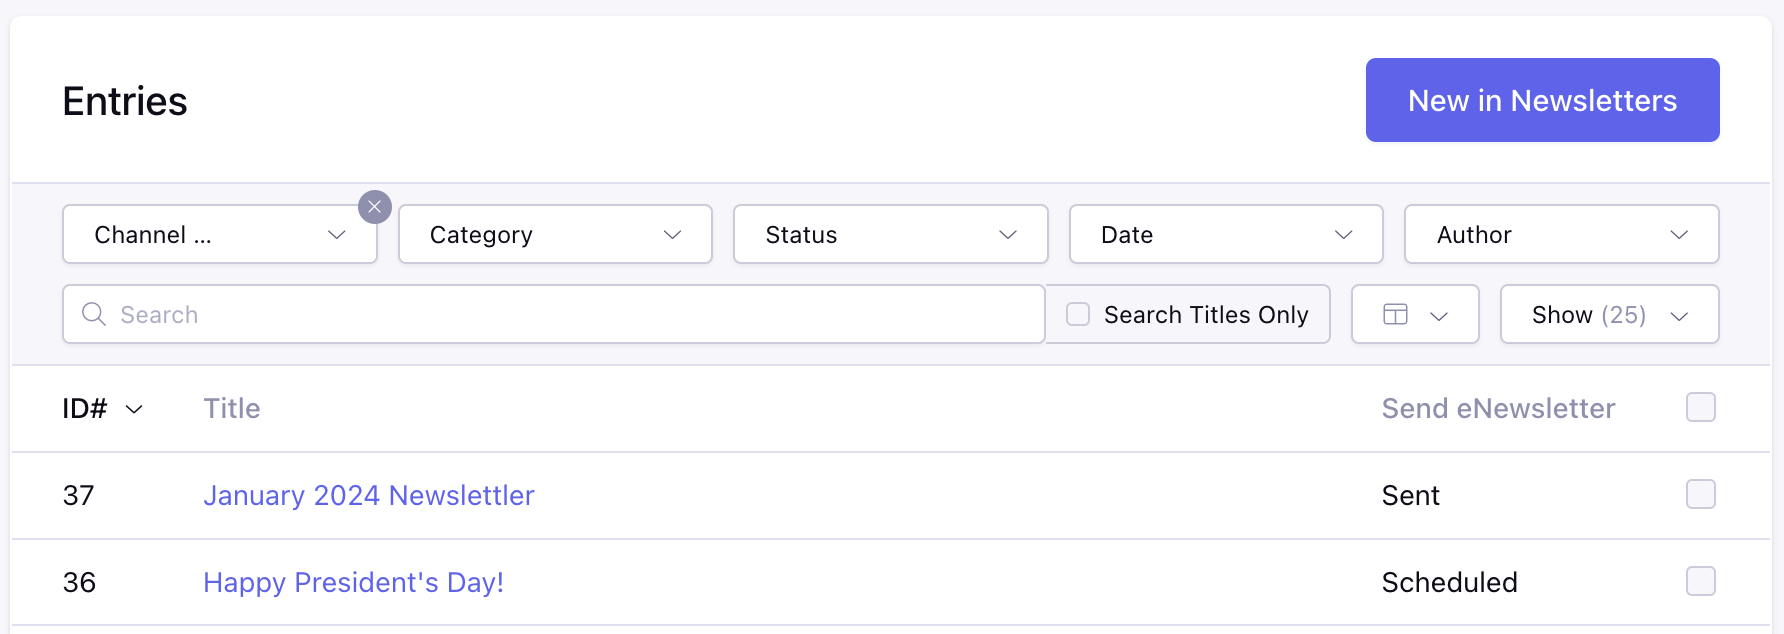
Viewing Send Status from Entry Listing
You can see at a glance on EE’s entry listing screen which entries have been sent. To display the Hop Postmaster field Sent Status, look for a symbol at the top of the listings that looks like a two-column layout. Click on this, and then check the box beside the Hop Postmaster field. Wait for the results to refresh, and you can view and sort by the Send Status field.
-
Notes and Cautions
Do set your defaults to something safe:
Set your Segment to a test list
Set your Subject line to something generic and inoffensive
Include logic in your Content templates to handle cases where content is not available
You may want to enable Revisions on the channel you choose in order to get better tracking of who edited and sent the email.
Sending multiple emails from one entry is supported. You can include multiple Hop Postmaster fields on one entry. However, we highly recommend you focus on doing one send at a time. Set one field to send, save the entry, and then work on the next send with the next field. This will minimize any chance of cascading error failures or timeouts caused by the Mailchimp API.
-
Updating
Updating is easy:
- Download a new version from this website, and extract on your hard drive.
- Upload the new files to their appropriate locations.
-
Uninstalling
- Navigate to the Add-Ons > Modules tab in your EE control panel and uninstall the module.
- Remove the add-on directory from your EE system folder on the server.